Tuesday, October 23, 2012

Felt Leaf Barette


I loved the pumpkin outfit that I made my daughter so much yesterday that I decided to keep the Fall ball rolling by making another hair clip out of felt leaves. I did some online searching and came up with the photos above. After looking around a little bit I started making my pattern. First I drew my leaf and acorn shapes and then once I had them how I liked them, I cut them out. The Canadian looking leaf in the top left was the hardest to get just right. I took me 3 drawings.
 Next, I pinned my patterns to my felt and started cutting. I cut 2 of everything. Then I added a little embroidery to a few of the leaves to make them pop.
I wanted a cluster of leaves and I started playing around with patterns. At first I thought I wanted something random but then I realized that something a little more symmetrical was the best way to go. Once I had the design I wanted, I placed them on the black felt and cut around them. The black felt was going to be my base. Then I started to hot glue the leaves down. Here is a step by step:


Next I carefully trimmed off all of the excess black fabric. Then, all that was left was to glue on a clip. I decided a barrette would be sturdier in this case. You could also add a pin back so you could wear it on your shirt. I don't like to add pin backs to clips that I intend for my daughter to wear, just in case they were to come open.
Here is my daughter modeling the finished product (it's a little blurry because it is hard to catch her being still!)
I also went outside and got a little artsy with my camera. Here is a shot of all 3 of the Fall bows I have made so far this year.
I designed the sunflower bow to be stacked with the pumpkin bow or worn alone. Simply slide the clip on the back of the pumpkin through the cuff on the front of the bow. Turn your clips in opposite directions so that they don't get too bulky on one side.


Monday, October 22, 2012

DIY Pumkin Outfit

I love all of the pictures I see of little girls dressed up in holiday outfits like this one:
I can't, however, imagine spending $57 on an outfit like this, or even having something that my daughter will only wear once! So I decided to come up with a different idea. My daughter has a very extensive wardrobe that consists almost entirely of hand-me-downs or clothes that were gifted to her. I try to work with what we have. Right now she has one white onesie and one cream one. I wanted to make her something cute like this, but I also wanted to make her a Christmas one and a pumpkin one. After thinking about it a little I asked my husband, "How would you attach something to clothes that you wanted to take off easily when you were done?", and he suggested that I hand sew it down lightly. Not sure why I didn't think of that simple solution myself. Here is how you can make a temporary Pumpkin decoration and matching hair bow yourself. 

For this project you will need:
Scrap Paper
Felt 
Stick Pin
Needle and contrasting thread
Scissors
Matching onesie or shirt
Hair Clip (if you want to make a matching hair bow)
Hot Glue Gun

First, I did a little searching and came up with these pictures on Pinterest:
I liked the colors from the first picture, the layering from the second picture and the leaf on the third picture. With that in mind, I started developing a pattern. I got some scrap paper and drew up my design. Then I cut it out and traced it again onto the paper.
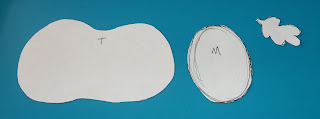
I went back to my first piece and cut out the middle. This allowed me to get the two pieces I needed for my layers. I drew a leaf from the picture and cut it out as well. I also labeled the pattern pieces intermediately so that I would always know which side was up. Here is the completed pattern:
The next step was to cut out my felt. I like to use a stick pin to hold the pattern in place while I am cutting. I decided to make the middle piece dark yellow so that it would stand out more. I also cut out a small rectangle of brown for the stem.
Next, just hot glue it together! I also cut out the pieces for my matching hair clip so that I could glue them all at one time. For the hair clip I cut a base out of black felt to make it a little stronger.
The last step is to hand stitch your decoration to your shirt. I chose a contrasting yellow thread and just did a running stitch all the way around the outside edges.
Now, when Fall is over, I can just snip it off! If I am gentle with it, I can save it and sew it to another shirt next year! I plan to make a turkey for Thanksgiving and something else for Christmas all on the same onesie that can be re-used again next year. What is your favorite holiday to dress up for?


Microwave Dessert Pin Tests

Chocolate Chip Cookie in a bowl
Fail!
This Pin Test did not turn out well at all. The only redeeming thing about it was all of the chocolate chips that went into it. If you really want to, you can find the original recipe here.  Here's the only thing I can imagine that went wrong. I tried doubling the recipe so that I could make just one for me and my husband and I used two whole eggs. It turned out mushy and chewy at the same time. Kinda of like a really thick pancake. I might try it again, following the recipe exactly, but I doubt it. I'd rather just make a whole batch. Here's what mine looked like:


Brownie in a Mug
WIN!
 This was a Pin that I tried before I started blogging so I don't have my own picture but this came out much better that I was expecting. Also, the picture tutorial is great! You can see the original post here at this marketing website. Make sure you have ice cream or milk on hand as this is pretty rich and you will need it! This could also be good with some mix ins like chocolate chips or nuts. If I remember right, I added a few white chocolate chips which was delicious.

What dessert do you wish could be made on the spot?
 

Denim Shirt Remake

 I have had this shirt for about 3 years now. I got it at an end of the season sale and wore it all through my pregnancy with my daughter. I really wanted to get a new chambray shirt this year, but then I remembered this one in my closet. It's great for the summer, but not very versatile. I was also never 100% sold on the military vibe it gives off. Also, the pockets, pocket flaps and buttons aren't exactly the best thing for a curvy girl. I decided it was time for a change.
First I carefully trimmed off the funny looking button flaps on the shoulders. With those gone, I can transition this from summer to fall with a cardigan.
Next, I brought out my seam ripper and took off those pockets and flaps. Although there were still less faded portions under the removed pockets, the effect was a lot better than before.
Finally, I changed the buttons. I wanted to give this a more basic feel so I sewed some plain white ones on instead.
Here is an example outfit with two shoe options. Which one do you like better?

Wendy's Copy-cat Chili Pin Test

We love chili, and Wendy's chili is up there on the top of our favorite fast foods list. This was the perfect recipe to try with the sort-of cold weather coming on. It's another Pin-test from this website. The recipe sounded simple enough and I didn't mind buying chili powder and cumin to add to my cupboard. I did omit the celery however because we were about to go out of town and the recipe only called for a few stalks. I had also intended to cut the recipe in half but ended up still using the full amount of some ingredients. Here is what I used:
Bag of Kidney Beans, cooked
A little less than a lb. of Ground Beef (we cut a 5 lb. roll into 6 pieces)
Whole Onion
Can of Pinto Beans
Can of Petite Cut Tomatoes
Can of Tomatoes and Green Chilies (cheaper that buying the chilies by themselves)
A 15 oz Can of Tomato Sauce
1 teaspoon Cumin
4 teaspoons Chili Powder (I read it wrong the first time)
Garlic Powder
Salt
Pepper
1 cup homemade chicken stock (instead of water)
It turned out great! We had enough for several meals, I brought some to a friend and we still froze a serving! My husband liked it with a little cheese.


Tuesday, October 16, 2012

Winter Headband from a Sweater Sleeve

I saw this adorable headband on Pinterest. Hoping it was a tutorial I pinned it, but sadly, it was a link to a sale page. You can buy it here for $38 plus shipping. So, I decided to re-create it instead! I had a sweater that I purchased last season for $3. One of the sleeves was coming off and I had intended to fix it but then I decided I liked it better without the sleeves.
So now I had a very cute sweater vest and two extra sleeves. I decided to just hold onto them. I knew one of them was just the thing for this project. I started by flipping the sleeve inside out and taking out the seam halfway down the arm. Then I folded it over so that the sleeve was now a tube that was the same width for the whole length.I did not want to trim the fabric because that would cause the fabric to fray.
Next I hand stitched the tube in place following the edge of the seam that I had just undone. I put my left hand inside of the tube while I worked so that I would not go all the way through to the front with my needle.
When that was done I flipped it over and inserted what was previously the shoulder piece into the cuff. Then I stitched the two ends together, again being careful not to go all the way through.
Next I turned it right side out and added just a few hidden stitches in the front so that it would not gap open when stretched over my head
We will be spending a lot of time up north this winter and now I'm ready for it! I like these a little better than a hot too because they seem like they would not mess up your hair as much.
Now if I could just get my hair to look like the models!

Monday, October 15, 2012

White Pizza Pasta

Saw this Pin and couldn't resist. If there is one thing the hubs and I like, it's pizza! Now mix that with pasta? Delish! I knew I had pepperoni and mozzarella cheese in the fridge that needed to get used, but I wasn't sure what else I had. After checking my stock I came up with a jar of Alfredo sauce and half a box of bow tie noodles. I also had chicken and ground beef in the freezer. Not exactly what the recipe called for: rigatoni, tomato sauce, Italian sausage, onions. But I decided to give it a try anyways. I also cut the recipe in half. To make my version you will need:
A half a box of pasta - if you are using spaghetti or fettuccine, I would suggest breaking it in half
1 to 2 cooked chicken breasts, diced - I used 1 1/2
A jar of Alfredo sauce - or about a cup and a half of homemade sauce
About 3/4 cup of milk
Frozen vegetables
2-3 cups of shredded mozzarella cheese
Pepperoni for garnish (optional)

From here I followed the same idea as the recipe from the Pin. Mix together your uncooked pasta, sauce and veggies. I used carrots and broccoli because that is what I had in the freezer. Mushrooms, peppers, onions, or asparagus would all be good as well. Maybe even some spinach leaves. Also, emptying the sauce into the bowl, I filled the jar about halfway with milk. I replaced the lid and shook it really well to get all of the sauce still stuck inside the jar and then I added this to my mixture as well. This gives the pasta a little more liquid to soak up.
Normally I would save a dish and mix it right in the crock pot, but this recipe calls for layering of your ingredients, so I had to use an extra bowl. The original recipe also suggested to spray your crock pot with cooking spray which is an excellent idea. I started with a layer of pasta, then a layer of chicken, then cheese. I repeated this two more times.
Finally, top with pepperoni and oregano if you like and let the crock pot do its thing. I cooked it on high for about an hour and 45 minutes. 
My husband and I loved this recipe with all of its cheesiness! My picky one year old even tolerated a few bites. It's not a recipe I would make all of the time though, what with the major fat content! I think you could add plenty of veggies and it would still be good, I just didn't happen to have too many on hand. So, that's white pizza pasta. Try some tonight!

Mod Flower Pin Test

Here is a Pin-test for a cute fabric flower brooch. I found this while checking out another Pin from this site: Gone to Earth. I really liked this one because it is completely different from almost all the other flowers I've seen. It is a little labor intensive but the result is very cute!
You can check out the tutorial here, and here is my version as a pin for my mom's coat.
I really liked the flower but I would make a few changes.
1. My flower came out massive, so I might scale it down a little next time.
2. If you look at the tutorial, there is a step in the petal making process where you put a few stitches in the back of the petal and then snip off the pointy ends. Then you thread all of the petals together. I had a problem with my thread slipping through the petals when I strung them together so I decided to hot glue them directly onto the circle of felt instead. If you are going to hot glue your petals I would still suggest stitching each petal to hold it together, but I would try to go though all of the fabric with your needle, not just the back edges. I would also not snip off the excess as it gives you more surface for your glue.
3. Instead of using a fabric covered button I just made a little yoyo in one of my fabrics and glued that in the center.

I will be making another one soon!

Sunday, October 14, 2012

Petal Power is a Real Pattern!

The hubs and I decided to make a quick run to the flea market this weekend since we were home and lately I have realized that a little thrifting may be an excellent way to add to my Vera Bradley collection. Two years ago I was given a travel accessory bag and zip I.D. case in purple punch.
Up until that point I had a love hate relationship with Vera Bradley bags, or really labels of any kind. I'm not a hipster, just not rich. I went to a private Christian Jr. High and High School where most of the kids came from wealthy families. My family wasn't poor by any means, but I was there because it was Christian, not because it was private. We had to wear uniforms but that made labels stand out even more. Shoes, back packs, jackets and jewelry were all we had to express ourselves with. I remember when Tommy Hilfiger took over my church youth group. I didn't have a job because my parents wanted me to be a kid as long as possible and I thank them for that. They weren't mean either, but there just wasn't money to spend on designer clothes. So, I decided that wanting to have a lot of things because of what brand they were just wasn't a practical thing for me. I think that having that mindset as a teenager saved me a lot of angst.
Don't get me wrong, I never lacked for anything growing up. My dad did buy me the much coveted Sketchers and Converse (shoes, and Dad buying something, were an exception to my self-imposed no labels rule), but besides the uniforms, most of my clothes were "consignment" (the nice word for thrift-store), hand me downs, or Wal-mart. I was really happy when my mom discovered Target.

Once I graduated high school and started working and paying (some of) my own bills, shopping was a true pleasure. It is definitely still on of my vices if I am not careful. Thanks to my mom I will still never pay the highest price on the tag though. I always go straight to the clearance racks. These days who doesn't? But those first Vera bags? Well, lets just say, sometimes labels can be nice.

A little after that Christmas I decided to buy my first Vera Bradley purse with some of my Christmas money, a cross body, also in Purple Punch, on clearance of course. It's a nice bag and one I know I will keep for a long time. The following Christmas my mom decided that a Vera purse was what she wanted so my Dad and I went and got her one. She loves it so much that she has used it for 10 months straight. When my daughter was born and I stopped carrying a purse altogether. I just put everything I needed in the diaper bag. A few months ago I found this backpack at a yard sale for $1 and it finally confirmed my decision that it was time for mine and my daughter's stuff to part ways. And thus, the hunt for thrifted Vera Bradley began. Besides the first bag I also found a ditty bag for $2 in need of a little repair and then yesterday, my latest find.
Looks fake doesn't it? I was super excited when my scanning eyes finally found their prize among the flea market tables. It was marked $5 but I offered $3 and they took it. Never hurts to bargain in that setting. Looking it over, "Vera Bradley was plainly written on the front.
There was also a tag on the inside, but it didn't look like the tags on my other bags.
When I got home I looked online at how to stop a fake and most clear differences were how the zipper pulls were supposed to be, (mine didn't have any) and how there was always a different lining fabric. Mine was lined in the same fabric as the outside. I did a little more searching and somehow came up with a name for the pattern - Petal Power. Searching for that gave me a lot more results but all of them on E-bay or similar sites, and people were still debating whether or not this was an actual pattern. Finally I got smart and decided to e-mail the company. Success! It is real. It was a limited edition pattern and thus not listed under their retired list. Moral of the story? When in doubt, go to the source.

Oh, and I did find the the different lining fabric after all.